
What a crazy couple of days it has been. I apologize I wasn't able to get to this blog post before now. The last couple of days have been absolutely NUTS! The day before I did Studio 5, I had the opportunity to take some yummy treats to a group meeting at our adoption agency. Then that evening (the night before Studio 5) Adam finished his Masters Degree! THAT IS RIGHT ....
WE ARE DONE!!


Then it was onto the finishing touches for my segment. I can't even begin to tell you how exhausted I was after staying up until 2:30 Wednesday night cooking, and preparing. I am very pleased with how it all turned out!

First a HUGE shout out to one of my favorite sponsors:

They are the ones that made these KILLER cupcakes. Darling on the inside, LIFE CHANGING on the inside!

Dippidee Bakery
476 North 900 West
American Fork Utah
801-756.4383
Next, lets get you some details on the printables. I have been told that the link to download these on Studio 5 wasn't working ... so here you go!

First for the little flags on all the food, you can click below to download the flags for the food I prepared. I wanted to do more, but it would have taken hours. Hopefully these will give you the flags you need!
CLICK HERE TO DOWNLOAD THE FLAGS

The invite is for private use only
CLICK HERE TO DOWNLOAD THE INVITE
The poster is for private use only
CLICK HERE TO DOWNLOAD THE POSTER
(Best if printed 11"x17")
First for the Rings:

These are made from Pool Noodles ... Yep the floating sticks you see at every store. The cheapest ones I found were at the dollar store.
Here are some instructions on how to get them into perfect circles.

1. Supplies: Duct tape, scissors, toilet paper roll, and noodle
2. Cut toilet paper roll in half
3. Curl a little tighter
4. Insert TP roll into the middle of the noodle and attach both ends of noodles together.
5. Roll different colors of Duct tape around noodles.
hint: I attached them all together with clear packing tape, and hung them with fishing string.
Next is for the crafts:
Olympic Ring Headband

To make this headband, spray paint a cheap plastic headband gold. Then click HERE for a tutorial on how to make the rosettes. I attached it all to a piece of felt, then attached it all to the headband.
Olympic "Fruit Loop" Necklaces

pretty self explanatory, however super fun for the young ones!
Decorations anyone?

Click HERE for instructions of how to do these!
Next for the Food ... MY FAVORITE PART!
Have I ever told you of my dream to be on a cooking show? Well this is as close as I have gotten so far! I love sharing yummy food with people!
Lets start with the United States shall we!

Mini Apple Pie
Ingredients:
• For the apple filling:
• 3 small granny smith apples, peeled and cubed
• 1/4 cup butter, cold
• 1 1/2 tablespoons all purpose flour
• 1/4 cup granulated sugar
• 1/4 cup brown sugar
• 1/4 teaspoon ground cinnamon
• For the egg wash:
• 1 egg
• splash of water
• Sugar for dusting the tops of the pies
• For the icing:
• 1 1/2 cups confectioner's sugar
• dash of milk
Directions
Makes about 16 or so
Method:
*You can either make your own pie dough, or buy a box of pre-made dough from the store. (I chose to do this, and it was fantastic!) Take your pick. Either way, it is delicious! If you make your own, to make around 16 mini pies, use a recipe for a double crust pie.
Directions:
In a small bowl and using a fork or your fingers, mix the butter into the flour, sugar and cinnamon until the butter is crumbly. Add the apples and mix the apples around so that each apple is evenly coated. Set aside.
2. Roll out the dough to about 1/16 in thickness. Use a 3 inch circle cookie cutter and cut out the dough circles. You will need two circles for every pie. Place the circles onto a cookie sheet lined with parchment paper. Scoop about 1 tablespoon of the apple filling into the center of the dough circle. Make the egg wash and using your fingertip, brush a light layer onto the very edges of the circle (this will ensure that the top circle will stick to the bottom circle). Place another dough circle on top, over the apple filling. Lightly press down around the edges.
3. Using the prongs of the fork, press along the edges of the pie to seal the edges.
4. Brush a light layer of the egg wash on top of the pies. Sprinkle with sugar. (I like to use turbinado sugar, you can find it in any grocery store labeled as raw sugar.)
5. Bake at 350 degrees for about 15-20 minutes or until the tops are golden.
6. To make them extra fancy, drizzle a little icing over the tops. Serve warm.
Additional US food ideas: Mini Sliders, Fried Chicken, Little Cheesecake cups with berries,
Mac & Cheese
Next comes our hosting country ... England!
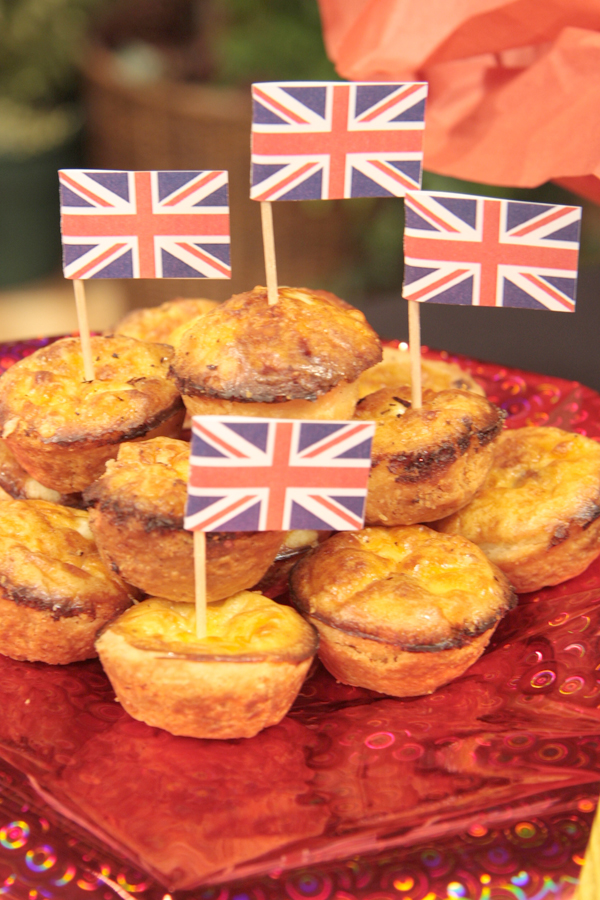
Mini Quiche
Recipe from http://luluthebaker.blogspot.com
This recipe made just under 24 mini quiche
Crust:
3 oz cream cheese, softened
1/2 cup butter, softened
1 cup flour
pinch salt
Blend well. Dough will be soft. Divide into 12 balls. Pat into ungreased muffin tins, covering the bottom and up the sides of each cup. Set aside.
Filling:
4 eggs
1 12-oz can evaporated milk
1/2 lb bacon, cooked, drained, and crumbled
1 cup shredded cheddar
1/4 cup onion, chopped fine
3/4 teaspoon salt
1/4 teaspoon sugar
dash pepper
Place even amounts of bacon, onion, and cheese in prepared crust. Beat eggs; add milk, salt, sugar, and pepper and mix well. Pour egg mixture into crust on top of bacon, etc. Bake at 350 degrees for 45 minutes. Let cool slightly before serving.
Additional ideas for England:
Biscuits & Jam

Yep, just from the freezer section in the grocery store!
Additional Food ideas for Mexico: Chips & Salsa, Fried Ice Cream, Chaco Tacos
China

Yep, these were freezer section too!
Additional Chinese food ideas: Wontons, Potstickers
For France

Brie Cheese Dip
Baked Brie
From: David Page
Ingredients:
- 1 whole wheel of Brie Cheese (Costco sells a 19 ounce Brie wheel which is perfect for this recipe)
- 1 cup light brown sugar
- 1 cup chopped pecans
- 1 cup craisins
- Accompaniment: crackers
Directions:
Preheat oven to 350 degrees. Start by carefully cutting the Brie in half, then on the top, carefully slice the rind off the top of the Brie wheel. On the “inside” sprinkle half the brown sugar, pecans, and craisins. Place top of Brie back onto bottom portion and top with remaining brown sugar, pecans, and craisins. Bake for 15 minutes
Serve warm with crackers.
Additional ideas:
Crepes
Italy

Mini Caprese Salad
Mini Caprese
Mandy Douglass
Ingredients:
- 1 cup balsamic vinegar
- 1 clove garlic (crushed)
- Grape Tomatoes
- Fresh Mozzarella Cheese (pearl size … I found mine at Smiths)
- Fresh Basil
- Toothpicks
Directions:
Pour balsamic vinegar into a small saucepan, and add the crushed garlic; bring to a boil over medium-high heat. Reduce heat to medium-low, and simmer until the vinegar has reduced to 1/4 cup. Set aside, and cool to room temperature.
Put together by placing grape tomatoe on the bottom, topped with a fresh basil leaf, and topped off with mozzarella pearl. You can lightly pour balsamic vinegar over top or leave as a dipping sauce.
Additional Italian Ideas: Mini Pizza, Procutto wrapped asparagus
Belgium

Gaufres De Liege | Belgian Waffles
Mandy Douglass
Ingredients:
- 3 c. flour
- 1 t. salt
- 1 oz (2 ½ t.) dry active yeast
- 2 c. milk
- 3 cubes butter
- 2 T sugar
- 2 eggs
- 2 c. chopped sugar cubes (each piece should be ¼ size of cube)
Directions:
Mix dry active yeast, salt, sugar, and flour in metal mixing bowl. Add milk to dry mixture and mix until dough is formed. Place dough in the sun or a warm oven (100 degrees) for 15 minutes. Add well softened (not melted) butter and eggs, mix well. Fold in chunks of sugar.
Cook waffles in a Belgian waffle maker until golden brown.
Cooking Tips:
A Belgian waffle maker is different than a normal waffle maker. It has deeper pockets and works the best.
I like to substitute some of the butter with cooking margarine for healthier reasons. If you decide to do likewise make sure that the margarine is a baking margarine.
The waffle maker will get really dirty during the cooking. Don’t worry about it. The sugar just caramelizes on the outside of the next waffle and makes it all that much better. I have a completely separate waffle iron I use for this recipe. I picked up at Walmart for $10.
Greece (not shown on the show)

Greek Salad
Recipe from:
From Taste of Home magazine
Ingredients
- 12 c. torn Romaine Lettuce
- 2 -3 tomatoes, cut into wedges
- 1 cucumber, peeled, halved, & sliced
- ½ green pepper, thinly sliced
- ½ Red Onion, cut into rings, & halved
- ½ c sliced olives
- ½ c. crumbled Feta Cheese
Lemon Dressing:
Ingredients
- ¼ c. Olive Oil
- 2 T. Lemon Juice
- 2 t. Dijon Mustard
- 2 Garlic cloves, minced
- ½ t. sugar
- ½ t. dried Oregano
- ¼ t. Salt
- ¼ t. dried Thyme
- 1/8 t. pepper
Directions:
Combine all Salad ingredients. Then combine dressing ingredients in a jar. Shake well. Pour over salad and toss to coat.
Other ideas:
Germany: Mini Bratwursts, Hitz Crackers, IBC Rootbeer or Beer
Brazil: Brazilian Lemonade
Canada: Ketchup Chips
Middle East: Hummus & Pita Bread
Australia: Tam Tams, lemingtons, pavlova, trifle, fruit cake, shortbread, ice cream with canned fruit, cadburry chocolate
Last but not least, Thanks to my mom, my two sisters Tammy & Marney, and my niece and nephew (2 of 19 & no. 20 on the way!!) that were able to join me in Studio. It was so fun to have them there!

Please email me if you have questions!
GO USA!!!
3 comments:
I am late posting - this is adorable!
I noticed that you used one of my images on your post above. It is the one of the fruit loop necklace. Would you please reference it or remove it. Here is a link to my original post in 2009. Thanks. Go USA!
http://sallyandersonphoto.blogspot.com/2009/06/fruitloop-necklaces.html
Post a Comment