I LOVE weddings! EVERYTHING about them. I love to help people plan, and I have to say that I LOVED my own wedding. In the June issue of CK there is a page using lots of photos from my wedding ... so stay tuned!
I had a reader, Jamie, ask if I had any good ideas for wedding centerpieces. I thought I would attach a picture of what I did for my wedding. My mom did all of the centerpieces ... even arranged all the flowers in the centers of all the tables. She is the REAL talented one in the family.
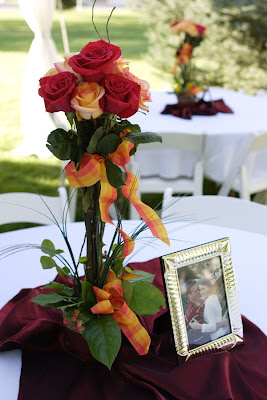
Congratulations Jamie ... and good luck with your wedding plans.
While we are on the subject of weddings, My sister-in-law's sister is getting married and she is making her sign in book. I thought I would include some pictures of the sign-in book that I made for our wedding, while I take a small trip down memory lane.
I chose to use an 11" x 8.5" Album made by American Crafts. Sad to say, they have discontinued it ... but it still goes down as my favorite album. The paper I used in the album is hands down the most beautiful scrapbook paper ever created by Scenic Route. It actually was the thing that inspired my selection of my wedding colors! (Red, Orange, & Yellow) Hope you enjoy ... and feel free to comment if you have any questions. I would be happy to help you out if you are creating your own. Not only did I create my own sign in book, but I have created many for friends and family.
Tuesday, April 7, 2009
Saturday, April 4, 2009
Knitting
So I have this friend. Her name is Lain Ehmann.
She sent me this DARLING little throw when I had Bryson. She is SO talented. She wrote this HILARIOUS book that EVERY scrapper should read. And she inspired me to start a new hobby of Knitting (like I needed another one right?)
So I have another friend named Kelli. She offered to come and teach me and the Young Women's group I am over how to knit. I made this cute scripture bagwhich in reality looks TERRIBLE ... but it is my first project, so give me a little credit!
Now I have started my second project. It is a baby blanket for my new little one. Lets just hope I can finish it before he arrives!
Wednesday, April 1, 2009
Tile pictures
So I had a reader ask "How do you post pictures to your blog in a tile form? " I thought I would share the answer with all of you. (see the picture of Bryson's first birthday below)
First ... I do it in photoshop. I create a new document that is 6" x 6" and has a resolution of 150 dpi.
Then I open all of the pictures I want to use and crop them to 2" x 2" with a resolution of 150 dpi.
Next I drag all of the mini pictures into the blank 6 x 6 document leaving equal space inbetween each picture.
Last AND MOST IMPORTANT ... when I am done arranging my photos I go to the menu "layers" and go to flatten object. This allows me to save it as a JPEG and attach it to my blog.
TIPS: You can also do this with a 4x6 document like the photo below and make the pictures 3" x 4" or any other size you want. I usually resize my pictures to 150 dpi so they don't take so long to upload to my blog! (example below)
Hope that answers your question Shannon!
M
Subscribe to:
Posts (Atom)